What You Are Learning
By the end of this lesson, you will understand what fiber cable is as a physical object, not just as an idea. You will know what it looks like on a reel, on a pole, and in a handhole, what the main parts of the cable do, and why a thin strand of glass needs a much larger protective structure built around it. You will also learn how to recognize common cable types at an overview level and how to spot visible damage. You will not be qualified to handle, cut, strip, or splice fiber cable. That work takes training, tools, and authorization. Recognition is your job.
Start With the Basics
Picture a large wooden or metal reel at a job site, the kind that looks like an oversized spool for thread. Wound around it is a black cable, round in cross section, thicker than a garden hose in some cases and thinner in others. That cable is fiber cable.
Now picture what is inside it. At the center of the work is a fiber, a strand of very pure glass that carries light. The light carries the signal. That glass strand is fragile on its own. It can be scratched, bent too sharply, crushed, pulled too hard, or damaged by water if it is left unprotected. Nobody buries a bare glass strand in the ground or hangs it from a pole and expects it to survive.
So the cable is the answer to a simple problem: how do you protect a fragile glass strand so it can survive shipping, pulling through conduit, hanging in wind and ice, sitting in a wet handhole, and working for years outdoors? You build layers around it. You give it cushioning, strength, water protection, and a tough outer skin. The finished product, with all those layers working together, is the fiber cable you see in the field.
That is the whole idea of this lesson. The fiber carries the signal. The cable protects the fiber so the signal can keep moving.
What Is It?
Fiber cable, also called fiber optic cable, is a manufactured cable that contains one or more glass fibers inside a protective structure. The structure is not decoration and it is not filler. Each part has a job, and this lesson names the parts at an overview level only. A later part of the curriculum, in Level 14, covers the inner construction in detail, including the core, cladding, coating, and buffer tubes. Here, the goal is to recognize the cable as a whole.
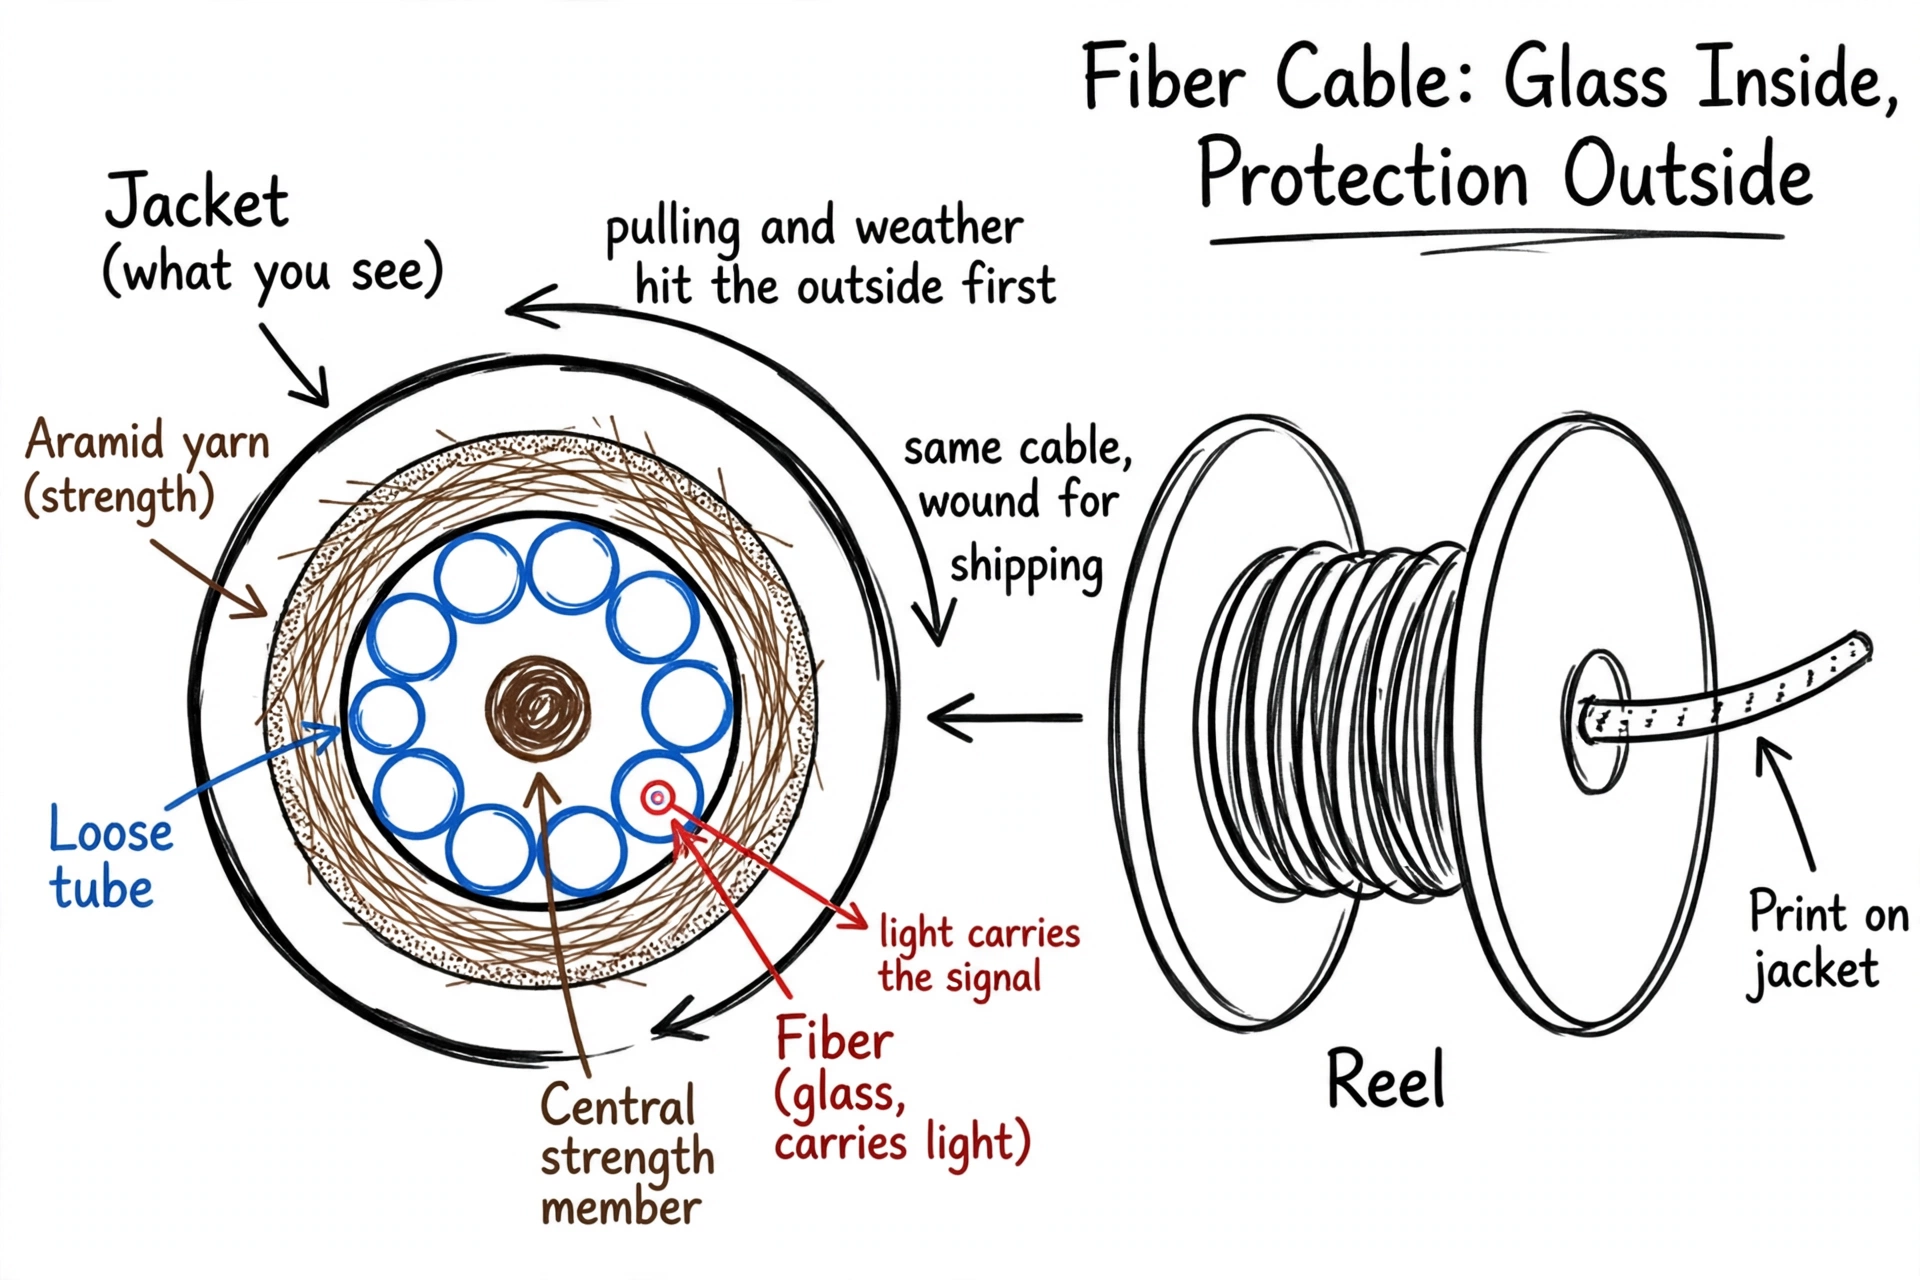
At a basic level, a typical outside plant fiber cable includes these parts:
- The fibers themselves. Thin glass strands that carry light signals. A cable may contain a small number of fibers or a large number, depending on its job. That number is called the fiber count, explained below.
- A way of grouping and cushioning the fibers. In many outdoor cables the fibers sit loosely inside small plastic tubes. That design is called loose tube, explained below. In other cables, mainly used indoors, each fiber has a thick protective buffer held tightly against it. That design is called tight buffered, also explained below.
- Strength members. Materials built into the cable so pulling force and hanging weight are carried by the cable structure, not by the glass fibers. Two common forms are aramid yarn and a central strength member, both explained below.
- Water protection. Outdoor cables use gel filling or dry water blocking materials inside to keep water from traveling along the cable and reaching the fibers.
- An outer jacket. The visible outer skin of the cable, explained below.
- In some cables, armor. A metal layer under the jacket for extra protection against crushing and chewing damage, explained below.
A fiber cable does not carry electric power in its glass fibers. The glass is not a wire, and it does not conduct electricity. Some cables in the field may also contain metal parts, such as armor or a locating wire, and those metal parts have their own safety and grounding rules that qualified crews handle. For a beginner, the safe point is simple: do not assume any cable is safe to cut or handle just because the signal inside it is light.
What Does It Look Like?
From the outside, most outside plant fiber cable looks plain. That plain look is worth learning, because beginners often expect something more obvious.
The jacket is what you see. The jacket is the outer covering of the cable. It protects the inside from sun, moisture, abrasion, and handling. Outdoor jackets are commonly black, though jacket color is set by the manufacturer and the product, not by a single universal rule a beginner can rely on to identify a cable. Do not identify a cable by color alone.
Look for the print on the jacket. Manufacturers print information along the jacket at intervals. That print is often called the print legend. It can include the manufacturer name, the cable type, the fiber count, the fiber type, and length markings that increase or decrease as the cable is paid off the reel. The exact wording and order vary by manufacturer. If you cannot read the print, do not guess the cable type. Report what you can read and let the project team confirm the rest from records.
Shape and size vary. A small drop cable that feeds a single building may be flat or small and round. A main route cable may be noticeably thicker and round. Size alone does not tell you the fiber count, because designs pack fibers differently. Two cables that look similar on the outside can contain very different numbers of fibers.
Where you will see it:
- On a reel. New cable arrives wound on a large reel. The exposed cable end is capped or sealed to keep water and dirt out, and the reel label carries product information. A cable on a reel should look evenly wound, not crushed, kinked, or spilling off the sides.
- On poles. Aerial cable, meaning cable installed overhead on poles, runs from pole to pole. It may hang on its own if it is a self supporting design, or it may be lashed to a separate support strand. From the ground you will mostly see a black line following the pole line, with coils of extra cable and sealed cases at some poles.
- In a handhole or at a splice point. Here you may see cable coiled as slack, as Lesson 5 described, and cable entering a splice closure, which is the sealed case that holds joined fibers. You see the jacket and the coil. You do not see the fibers unless a qualified crew has opened the cable, which is not beginner work.
- Entering a building or a cabinet. Cable may come up out of conduit and into an enclosure. The visible part is still just jacket.
One more look to learn: a cut end of cable, seen only when a qualified crew has prepared it, shows the layers in cross section, with the jacket on the outside, strength materials inside it, and small tubes or coated fibers in the middle. Beginners should look at a prepared sample in training if one is provided. Beginners should never cut a cable to create one.
What Does It Do?
Fiber cable does two jobs at once.
First, it carries the signal. Light travels through the glass fibers inside the cable. That light is the communications signal for internet service, phone service, and data connections. Without a continuous, undamaged path for the light, the service at the far end degrades or stops.
Second, it protects that path. The cable structure shields the glass from the forces that would break it or bend it enough to leak signal. Pulling force goes to the strength members. Sun and weather hit the jacket. Water is stopped by the water blocking design. Minor bumps and rubbing are absorbed by the layers between the outside and the glass.
Keeping both jobs in mind explains most field behavior around cable. Crews are careful about how cable is stored, how it is pulled, how tightly it is coiled, and how it is supported, because a cable can look fine on the outside while the glass inside has been stressed. That is also why the manufacturer instructions for a specific cable matter. Bend limits, pulling limits, and handling limits are set for that product. They are not universal numbers, and this lesson does not state any, because a limit that is right for one cable can be wrong for another. On a real job, the crew follows the data sheet for the cable being installed and the project specifications.
Where Does It Fit?
Fiber cable is the part that travels inside the pathway you have already learned about. Lesson 3 covered pathways, Lesson 4 covered conduit, and Lesson 5 covered handholes. The cable is what goes through the conduit, is pulled from handhole to handhole, is lashed or self supported on the pole line, and is coiled as slack where crews will need it later.
In the build sequence, cable work comes after pathway work. The route is built first, then cable is placed, then fibers are spliced where cables join or branch, then the network is tested, and then service is turned up. Inspection touches cable at several points: checking that the right cable arrived, that it was stored and handled correctly, that it was placed without visible damage, and that slack and coils were left in an organized way.
The cable also connects the other parts of the network. A feeder cable carries many fibers along a main route. A distribution cable branches fibers toward a neighborhood area. A drop cable carries a small number of fibers to a single home or business. Those are roles, not separate mysteries. The same basic idea, glass inside a protective structure, is built in different sizes for different parts of the route.
Why Does It Matter?
Fiber cable is the reason the rest of the construction exists. Conduit, handholes, poles, and hardware are all there to support and protect the cable. If the cable is damaged, the pathway work behind it cannot deliver service.
Damage is also hard to undo. A section of cable that was crushed on a reel, kinked during a pull, or cut by later digging may have to be removed and replaced, or cut back to a good point and re-spliced, which adds enclosures, labor, and delay. Some damage does not show on the jacket at all, and it is found only when testing shows loss on the fibers. That is why handling rules exist even though the cable looks tough. The jacket is tough. The glass inside it is still glass.
Choosing the right cable type matters for the same reason. A cable built for indoor use does not have the water protection and jacket toughness an outdoor route needs. A cable built for underground use may not be built to support its own weight on a long pole span. The project design and specifications name the cable for each section. A beginner who notices that the jacket print does not match the cable the plans call for has caught a real problem early, when it is cheap to fix.
What Does Good Look Like?
A good fiber cable installation, in general good practice terms, looks like this:
- The cable matches the project. The jacket print and the reel label match the cable type and fiber count the design calls for at that location.
- The cable on the reel is stored correctly. The reel stands upright on its flanges, is not lying flat, is not crushed by other materials, and the cable ends are sealed or secured the way the manufacturer directs so water and dirt stay out.
- The jacket is intact. No cuts, gouges, flat spots, kinks, or places where the cable was bent back sharply or crushed under equipment.
- Coils of slack are neat and supported. Coils look like smooth loops of even size, secured in the handhole or on the pole, not tangled, twisted, or hanging by a fiber bearing point.
- On poles, the cable follows the pole line in an orderly way, supported as designed, with no section sagging far below the rest of the run or pulled tight in a way that strains hardware.
- Records match reality. The fiber count and cable type recorded for a section match what is actually installed there.
Important distinction: these are general good practice characteristics. Whether a cable installation is accepted on a specific job is decided by the contract specifications, the owner requirements, and the manufacturer instructions for that cable. There is no single universal checklist, and limits such as bend and tension come from the product data sheet, not from memory.
What Can Go Wrong?
Common cable problems in the field include the following:
- Wrong cable installed. A cable with the wrong fiber count or the wrong construction for the environment gets placed. Found early, it is a swap. Found after splicing, it is rework.
- Jacket damage. Cuts from tools, abrasion from pulling over a sharp edge, or crushing from a vehicle or a dropped reel can open the jacket. An open jacket lets water in and removes the protection the fibers depend on.
- Overbending and kinking. A cable bent too sharply, stepped on at a tight corner, or kinked when a coil collapses can damage the glass inside even if the jacket springs back and looks normal.
- Pulling damage. If pulling force is applied to the wrong part of the cable, or if a pull exceeds the limit for that product, the fibers inside can be stretched and damaged. This is one reason strength members exist and why qualified crews attach pulling equipment the way the manufacturer directs.
- Water entry. A damaged jacket, an unsealed cable end left open on a reel, or a cable type without proper water blocking used outdoors can let water travel inside the cable, where it can damage fibers over time and freeze in cold weather.
- Rodent and crush damage on unarmored cable. In places where chewing animals or heavy surface loads are a known risk, a cable without armor has less protection. The design is supposed to account for the risk. A beginner noticing damage should report it, not redesign the route.
- Broken fibers from careless handling of exposed fiber. When a cable is opened by a crew, the bare glass can break into tiny sharp shards. Those shards are a safety hazard, covered in the field section below.
What Should Someone Notice in the Field?
A beginner’s job is to notice and report, not to handle. Specific things to observe:
- Read the reel label and the jacket print where you can do so safely from the ground or from a standing position. Note the manufacturer, cable type, and fiber count if they are printed and legible. Compare them to what the plans call for, and report a mismatch.
- Look at storage. Reels should stand upright, cable should be wound evenly, and cable ends should be sealed or secured, not dangling open in dirt or water.
- Look at the jacket along any exposed section. Report cuts, gouges, flat or crushed spots, kinks, and places where cable rubs on a sharp edge.
- Look at coils. Slack coils in a handhole area or on a pole should be smooth, even, and supported. Report tangled, twisted, or collapsed coils.
- Look at the pole line. Report cable that is sagging far more than its neighbors, hanging loose from its supports, or lying on the ground.
- Notice cable type against place. If cable marked for indoor use appears on an outdoor section, or an unarmored cable is lying exposed where vehicles cross, report it to the project team as a question, not as a conclusion.
Safety, stated plainly:
- Broken fiber is sharp glass. Tiny shards from a broken or cleaved fiber can stick in skin and eyes and are hard to see and remove. Beginners must never pick up fiber scraps, never reach into a splice closure or a tray where bare fiber is exposed, and never handle cut cable ends. Qualified crews collect scraps in a marked container and dispose of them properly.
- Never look into the end of a fiber or a cable. A fiber may be carrying light you cannot see, and that light can injure an eye. Qualified technicians check whether a fiber is live with a power meter. A beginner treats every fiber end as live and looks away from it, not into it.
- Reading this lesson teaches you to recognize fiber cable and visible problems. It does not qualify you to pull, cut, strip, open, splice, or test cable, to climb a pole, or to work in traffic. Those jobs require training, authorization, and protective equipment.
Practical Example
This is a hypothetical example, not a report of a real incident.
A hypothetical crew is building a short underground route to a new cabinet. The design calls for one outdoor loose tube cable with a stated fiber count, running through conduit from a handhole to the cabinet. On the morning of the pull, a beginner who has been asked to walk the materials area notices two reels. The reel that has been staged for the job has a jacket print that names a different cable type and a lower fiber count than the design sheet the foreman showed at the tailgate talk. The second reel, parked behind it, matches the design.
The beginner says nothing at first, thinking the print must not matter. Then she remembers that the print legend is the cable’s identification, and she reports the mismatch to the foreman before the pull starts. The foreman checks the reel labels against the design, confirms the staged reel is a cable meant for a different section of the project, and swaps the reels. The pull takes an extra twenty minutes to restage. Discovering the same mistake after the cable was pulled, coiled, and spliced would have cost a full re-pull and a new splice.
The lesson in this hypothetical story is the noticing: reading the print, comparing it to the plan, and speaking up before the work happens is beginner work, and it is valuable work.
Key Terms
- Fiber cable (fiber optic cable). A manufactured cable containing one or more glass fibers inside a protective structure of cushioning, strength materials, water protection, and an outer jacket.
- Fiber. A thin strand of very pure glass that carries a light signal. The signal carrying part of the cable.
- Fiber count. The number of individual fibers inside a cable. It is a property of the specific cable product, printed on the jacket and listed on the reel label, and it varies by design and by the job the cable does.
- Jacket. The outer covering of the cable. It is the part you see, and it protects the inside from sun, moisture, abrasion, and handling.
- Print legend. The information printed along the jacket at intervals, which can include the manufacturer, cable type, fiber count, fiber type, and length markings. The exact format varies by manufacturer.
- Strength member. A material built into a cable to carry pulling force and hanging weight so the glass fibers do not have to. See aramid yarn and central strength member.
- Aramid yarn. A strong synthetic yarn built into many fiber cables as a strength member. In cables designed to pull on it, a qualified crew attaches pulling equipment to the yarn, so force goes to the yarn and not to the glass. In other designs the manufacturer directs the crew to pull on a different strength member, such as the central strength member.
- Central strength member. A stiff rod at the center of many outdoor cables, around which the tubes holding the fibers are arranged. It adds strength and helps the cable keep its shape. It may be metal or nonmetal, depending on the design.
- Loose tube. A cable construction in which fibers sit loosely inside small plastic tubes, with gel filling or dry water blocking to keep water out. It is the common construction for outdoor, outside plant cable because it isolates the fibers from outside forces and temperature change.
- Tight buffered. A cable construction in which each fiber carries a thick protective buffer held tightly against it. It is mainly used indoors and for shorter premise runs, where easier handling and direct termination matter more than harsh outdoor protection.
- Armor. A metal layer under the jacket on some cables, added for extra crush protection and to resist chewing damage. An armored cable has armor. A non-armored cable does not, and it relies on the jacket and the route design for protection.
- Aerial cable. Cable installed overhead on poles. Some designs support their own weight between poles. Others are lashed to a separate support strand.
- Drop cable. A smaller cable, usually with a low fiber count, that carries service to a single home or business.
- Reel. The large spool that cable is wound on for shipping and installation. Also called a drum on some products.
Check Your Understanding
1. A bare glass fiber carries the signal. Why is it never installed by itself outdoors? 2. What is the difference between a loose tube cable and a tight buffered cable, and which one is the common choice outdoors? 3. A beginner reads a jacket print that does not match the cable type and fiber count on the design sheet. What should she do, and why does it matter that she catches it before the pull? 4. A coil of slack cable looks smooth and the jacket looks unmarked after a rough pull. Does that prove the fibers inside are undamaged? Explain. 5. Why must a beginner never look into the end of a fiber and never pick up fiber scraps?
Answer key
1. The glass is fragile. It can be bent, crushed, pulled, scratched, and damaged by water. The cable structure around it provides cushioning, strength, water protection, and a tough jacket so the fiber can survive installation and years outdoors. 2. In loose tube construction the fibers sit loosely inside plastic tubes with gel or dry water blocking, which isolates them from outside forces and temperature change. In tight buffered construction each fiber has a thick buffer held tightly against it, which suits indoor handling and termination. Loose tube is the common outdoor, outside plant choice. 3. She should report the mismatch to the foreman or project team and let them check the reel label and the design before work starts. Installing the wrong cable means the route has the wrong fiber count or the wrong construction for its environment, and fixing it after pulling and splicing costs far more than swapping a reel. 4. No. Fibers inside can be stretched or overbent during a pull while the jacket springs back and looks normal. Damage that the eye cannot see is found by testing, which is qualified crew work. A good looking jacket is a good sign, not a proof. 5. A fiber may carry invisible light that can injure an eye, so ends are treated as live and checked only with a power meter by qualified technicians. Broken fiber produces tiny sharp glass shards that can stick in skin and eyes, so scraps are collected and disposed of only by trained crews with the right containers and protective equipment.
Lesson Takeaway
Fiber cable is a protective structure built around fragile glass. The glass fibers carry light, and the light carries the signal. Everything else in the cable, the tubes or tight buffering that cushion the fibers, the aramid yarn and central strength member that carry the load, the water blocking that keeps moisture out, the armor on some cables, and the jacket you can actually see, exists so the glass can survive being shipped on a reel, pulled through conduit, hung on poles, and left outdoors for years. In the field, your job is to read the print, check the storage and the jacket, notice the coils and the pole line, and report mismatches and damage. Never look into a fiber end, never handle bare fiber or scraps, and never treat recognition as qualification to cut, pull, or splice cable.
Sources and Technical References
- The Fiber Optic Association (FOA), “Fiber Safety.” Safety rules used in this lesson: treat fiber shards like glass splinters, wear eye protection for fiber work, dispose of scraps in a marked container, and never look directly into the end of a fiber until a power meter confirms it is dark. https://FOA.org/SafetyPoster.pdf
- The Fiber Optic Association (FOA), “Fiber Optic Microcables.” Background on high fiber count cable designs, loose tube cable as a long standing high count design, and the role of a central strength member in microcable designs built for blowing into microducts. http://thefoa.org/tech/ref/cable/Microcables.html
- Corning, “Outside Fiber Optic Cable Design Considerations.” Manufacturer discussion stating that the major outside plant cable families are loose tube, micro cables, and ribbon, and that loose tube design keeps fiber under low strain and tolerant of axial forces. https://www.corning.com/in-building-networks/in/en/home/applications/local-area-networks/knowledge-center/traditional-lan-knowledge-center/considerations-in-outside-fiber-optic-cable-design.html
- Corning, “Choosing the Right Cable” (LAN-3483-AEN). Manufacturer guide contrasting indoor tight buffered designs, outdoor loose tube designs, and indoor/outdoor designs that may use either, with fiber count ranges that vary by product family. https://www.corning.com/catalog/coc/documents/quick-start-guides/LAN-3483-AEN.pdf
- Corning, ADSS Aramid Single Jacket Cable product specification (LT 2.3). Example of a specific aerial product: all dielectric self supporting design, nonmetallic strength members over the cable core, loose tube construction, and dry water blocking by swellable elements. All values in that document are for that product only, not general rules. https://www.corning.com/catalog/coc/documents/product-family-specifications/pfss/a/en-US/adss-aramid-single-jacket-cable-up-to-200m-span-lt-2.3_CALA_AEN.pdf
- FS.com, “Loose-tube 250um Fiber Cable vs. Tight-buffered 900um Fiber Cable.” Comparison used for the overview contrast: loose tube cables place fibers in a tube with gel or water blocking for outdoor and harsh settings, while tight buffered cables are chosen for indoor flexibility and handling. https://www.fs.com/blog/loosetube-250um-fiber-cable-vs-tightbuffered-900um-fiber-cable-4777.html
- Remee Wire and Cable, “Loose Tube vs Tight Buffered Fiber: Indoor and Outdoor Guide.” Comparison used for application placement: loose tube for outdoor, campus, aerial, duct, and direct buried use, and tight buffered for indoor and premise use, plus the note that armor is a separate added feature and not part of what loose tube means. https://remee.com/loose-tube-vs-tight-buffered-fiber-indoor-outdoor-guide/
Could not verify: a single universal jacket print legend format, a universal jacket color code for outside plant cable, or universal fiber count ranges for cable roles such as feeder, distribution, and drop. Manufacturer sources show that print wording, color, and available counts vary by product and by maker. This lesson therefore treats the jacket print and reel label for the specific cable, plus the project design, as the authority, and it does not state bend radius, pulling tension, diameter, or span limits because those are product specific values that must come from the data sheet for the cable being installed.
Previous lesson: Lesson 6: What Is a Utility Pole? | Back to Level 1 hub | Next lesson: Lesson 8: What Is a Splice?